Windows 10X
You are now entering State Separation Zone
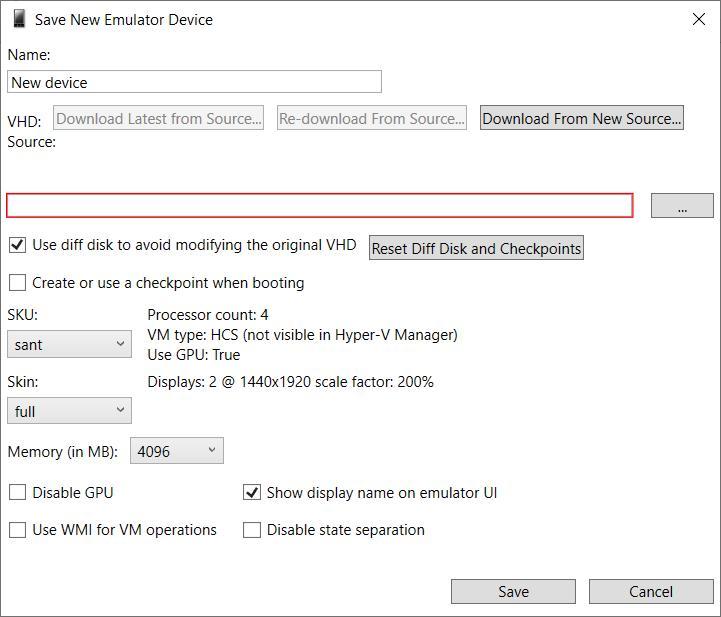
- Microsoft Emulator (XdeManager)
- Installing Windows 10X 195xx (emulator image) on real hardware
- Dual booting legacy Windows 10 with Windows 10X
- Creating a pool from scratch
- Installing Windows 10X (from cabs) on real hardware
- Installing Windows 10X (from cabs with Device Image Generator) on real hardware
- Reverting 10X boot restrictions & returning to classic 10
- Installing Windows 10X 20279 (emulator image) on real hardware
Microsoft Emulator (XdeManager)
Links to the app
Enabling Internal Mode
- Create
HKEY_LOCAL_MACHINE\SOFTWARE\Policies\Microsoft\SQMClient - Set key
MSFTInternalto 1 (DWORD)
Installing Windows 10X 195xx (emulator image) on real hardware
Here's some quick notes on installing Windows 10X on real hardware. For this example, we're assuming a system with no other critical disks installed, and a helpful host system being around to set up the initial image.
Prerequisites
Host
- Windows 10 Manganese build (195xx).
- Utility USB flash drive of ~32GB+.
Target
- CPU with Hyper-V support for VAIL.
- Graphics card with DCHU drivers available.
- UEFI system firmware with the ability to disable Secure Boot.
- Boot drive larger than 128 GiB. An 128 GB SSD usually isn't.
- Preferred: 4Kn boot drive. We'll provide steps a bit later for converting the image.
Host work
Fetch and mount the emulator image
Make sure you have a clean Flash.vhdx from the W10X emulator. Copy it someplace, and preferably keep another backup as well.
Mount it using PowerShell (as administrator):
Mount-VHD "X:\WCOS\Flash.vhdx"
Check if the emulator image is mounted correctly:
Get-StoragePool -FriendlyName OSPool
This should look like the following:
FriendlyName OperationalStatus HealthStatus IsPrimordial IsReadOnly     Size AllocatedSize
------------ ----------------- ------------ ------------ ----------     ---- -------------
OSPool       OK                Healthy      False        False      127.9 GB      21.81 GB
Gather UpdateApp and verify it works
Start diskpart so you can mount MainOS:
list volume
# select the volume called MainOS
select volume 42
# assuming M: is free
assign letter=m
exit
From the MainOS partition, go and hunt down the following files and drop them in a standalone folder (for example, X:\WCOS\Tools):
\Windows\Servicing
- UpdateApp.exe
- CbsApi.dll
- CbsMsg.dll
\Windows\System32
- CbsCore.dll
- DrvServicing.dll
- IUSpaces.dll
- IUSpaces_vb.dll (copy and rename IUSpaces.dll)
- UpdateAPI.dll
- cimfs.dll
- cmiadapter.dll
- cmiaisupport.dll
- cmintegrator.dll
- dpx.dll
- drvstore.dll
- msdelta.dll
- mspatcha.dll
- mspatchc.dll
- turbostack.dll
- wcp.dll
- wdscore.dll
Run cmd.exe as administrator, go to the tool directory, and try getting the installed packages on the image:
cd /d X:\WCOS\Tools
updateapp getinstalledpackages
The result should look a lot like the following:
UpdateApp - Update Application for Windows Mobile
[00:00:00] Loaded servicing stack from X:\wcos\tools with session name IUPackageInfoSession_EFIESP
[00:00:00] External storage staging directory is: (null)
[00:00:00] Closing session IUPackageInfoSession_EFIESP
[00:00:00] Loaded servicing stack from X:\wcos\tools with session name IUPackageInfoSession_MainOS
[00:00:00] External storage staging directory is: (null)
[00:00:01] Closing session IUPackageInfoSession_MainOS
164 packages:
Microsoft-OneCore-HyperV-Guest-UpdateOS-Package~31bf3856ad364e35~amd64~en-US~10.0.19563.1000, UpdateOS
Microsoft-OneCore-HyperV-Guest-UpdateOS-Package~31bf3856ad364e35~amd6410.0.19563.1000, UpdateOS
Microsoft-OneCore-ServicingStack-UpdateOS-Package~31bf3856ad364e35~amd6410.0.19563.1000, updateos
Microsoft-OneCore-ServicingStack-UpdateOS-UX-Package~31bf3856ad364e35~amd6410.0.19563.1000, updateos
Microsoft-OneCoreUpdateOS-Product-Package~31bf3856ad364e35~amd64~en-US~10.0.19563.1000, updateos
Microsoft-OneCoreUpdateOS-Product-Package~31bf3856ad364e35~amd6410.0.19563.1000, updateos
Microsoft-Windows-OneCoreUpdateOS-ImageCustomization-Package~31bf3856ad364e35~amd6410.0.19563.1000, updateos
Microsoft-Composable-ModernPC-BootEnvironment-Core-CodeIntegrity-Sbcp-Package~31bf3856ad364e35~amd6410.0.19563.1000, EFIESP
Microsoft-OneCore-BcdBootoption-Package~31bf3856ad364e35~amd64~~10.0.19563.1000, EFIESP
    [...]


getinstalledpackages completed successfully
command took 7 seconds
If it does, congratulations! You can move on to the next step.
Inject graphics and network drivers
For this example we'll show the Intel HD Graphics driver, but you might need to add more INFs depending on your hardware. If you can't find the right INFs, why are you even doing this?
Place extracted Intel drivers in a directory, so that you have e.g. X:\WCOS\DHCUDrivers\Graphics\iigd_dch.inf. Open iigd_dch.inf, and note down the values for 'Provider' and 'DriverVer'. For me, those were:
Provider=%Intel%
DriverVer=08/23/2019,26.20.100.7158
The provider name is an indirected variable here, so we go and find what %Intel% meant as well. A bit below in the INF, we find the following:
Intel = "Intel Corporation"
Good! Now, invoke updateapp with the data we've just discovered to install the INF to the BSP partition in your WCOS image:
updateapp install "DriverPackage|X:\WCOS\DHCUDrivers\Graphics\iigd_dch.inf|Intel_Corporation-iigd_dch.inf~amd64~26.20.100.7158~bsp|0"
Note the recurrence of Intel_Corporation and 26.20.100.7518. The installation process will complain with an error code of c0880005 if you get the 'keyform' wrong.
The general rule for inf file names and provider names in the 'keyform' is the following:
- Any space in the inf name or the provider name must get replaced by an underscore '_'
- Any dash in the inf name or the provider name must get replaced by an underscore '_'
After you've installed your favorite driver packages, we can prepare the utility flash drive.
Make a utility flash drive
Gather the following assets into a directory we'll label X:\WCOS\UtilityDrive\Boot:
-
From an ISO of Windows 10 19559 AMD64 (or higher - see UUPDump or similar for generating these):
- boot\
- EFI\
- sources\boot.wim
- bootmgr.efi
-
For later servicing, your WCOS\Tools folder. Use a hex editor to replace any mention of the Unicode string
X:\Windowsin UpdateAPI.dll and UpdateApp.exe with something likeX:\Wbndows, or expect any servicing tasks to fail. -
An x64 EFI shell. Rename EFI\boot\bootx64.efi to EFI\boot\winx64.efi, and name the shell as EFI\boot\bootx64.efi. You'll need the shell in order to ever boot regular Windows again (including PE).
-
A file called
startup.nshin the root:dmpstore -d SecureBootPlatformID fs0:\efi\boot\winx64.efi fs1:\efi\boot\winx64.efi fs2:\efi\boot\winx64.efi fs3:\efi\boot\winx64.efi fs4:\efi\boot\winx64.efi fs5:\efi\boot\winx64.efi fs6:\efi\boot\winx64.efi fs7:\efi\boot\winx64.efi fs8:\efi\boot\winx64.efi fs9:\efi\boot\winx64.efi fsA:\efi\boot\winx64.efiIf you are having troubles getting back to Windows PE/Windows Desktop, you may also try the following extra commands in startup.nsh: (Warning: these will kill every variables you have saved on your system)
dmpstore -d -guid BA57E015-65B3-4C3C-B274-659192F699E3 dmpstore -d -guid 77FA9ABD-0359-4D32-BD60-28F4E78F784B dmpstore -d -guid EAEC226F-C9A3-477A-A826-DDC716CDC0E3 -
gdisk64.exe from GPT fdisk.
Partitioning
- Connect your UFD.
- Open
diskpart. -
list disk,select diskthe right disk, or you'll lose all data on it and will have to do a long partition scan to have any hopes of retrieving your data, andclean+convert gpt. -
create partition primary size=5000,format fs=fat32 quick,assign letter=yto make a bootable FAT32 partition. -
create partition primary,format fs=exfat quick,assign letter=zto make an exFAT partition to house the VHDX.
Putting things in place
Place your boot drive directory on the drive you called Y:. Dismount-VHD "X:\WCOS\Flash.vhdx in your PowerShell to unmount the VHDX, and copy the VHDX to Z:. You should now have a tree structure similar to:
Y:\
    Boot\
    EFI\
    Sources\
    Tools\
    startup.nsh
Z:

Flash.vhdx
Eject and unplug the UFD.
Target work
Use your throwaway laptop or other modern enough system with larger-than-128GB system drive. Make sure Secure Boot is off.
Boot Windows PE
Boot it on the target. Really. Once you get into Setup, press Shift-F10 to open a command prompt. Go back and open another, for good measure. Alt-Tab works for switching here.
Copy the VHD (destructive!)
Find out where your USB flash drive is mounted. This will involve doing a lot of the following:
C:
dir
D:
dir
E:
dir
F:
dir
Here, we'll assume the boot volume is D: and the volume with Flash.vhdx is E:.
Open diskpart, and attach the VHD:
select vdisk file=E:\flash.vhdx
attach vdisk readonly
# wait a minute or so
list disk
# if MainOS etc. show up as online, good!
Note down the ID of a 2048 MB disk with a 2048 MB free space, and subtract 1 from it.
  # note: there's no 16
  Disk 17   Online         2048 MB  2048 MB
The ID to note down, therefore, is 16. Also, note down the ID of the target disk (3 in this case).
Wipe it. Yes. That's data loss for you. Make sure you've got backups of anything important on there.
select disk 3
clean
convert mbr
exit
(replacing 3)
Copy the VHDX's content to your disk:
E:\Tools\ddrelease64 if=\\.\physicaldrive16 of=\\.\physicaldrive3 bs=8M --progress
(replacing 16 and 3)
... and go have a hot beverage while waiting for this to hit 131072M.
Rebuild the GPT (for 512-byte disks only)
You probably have a 512-byte disk, so you're going to have to rebuild the GPT. Yay!
Run commands along the following:
> E:\tools\gdisk64 -l \\.\physicaldrive16
[..]
Number  Start (sector)    End (sector)  Size       Code  Name
   1             512            8703   32.0 MiB    EF00  BS_EFIESP
   2            8704        33554426   128.0 GiB   4202  OSPool
Remember the numbers (start, end, code and name) for each partition. Multiply the numbers by 8 (since 4K/512 = 8) - so you get 4096, 69624, etc.
Now, we'll create a new GPT for the target disk:
E:\tools\gdisk64 \\.\physicaldrive3
# accept any warning
x
z
E:\tools\gdisk64 \.\physicaldrive3
accept the warning
n
1
4096
69631
EF00
n
2
69632
268435415
4202
c
1
BS_EFIESP
c
2
OSPool
p
check if it makes sense - matches the above but with different sector numbers
w
Exit all open windows, and your system should reboot.
Boot Windows PE, again
Boot into Windows PE again - not the internal disk you just overwrote. Verify in diskpart if you can list volume and it'll show MainOS etc. without you having attached the VHD.
Remove WCOS Security
In Windows PE, open diskpart and do select volume. Find the volume named ÈFIESP we will assume here its volume id is 6, yours may be different. Then we run select volume 6 and assign. Do list volume again to find the drive letter of EFIESP, in our case it's E:, yours may be different.
Delete the following file:
del E:\efi\Microsoft\Boot\SecureBootPolicy.p7b
You may additionally replace winsipolicy.p7b with the one from a desktop sku (the file is located in the same folder).
Boot W10X
OK, now you can boot your internal disk. If you haven't followed the Remove WCOS Security instructions, this will set a Secure Boot policy value, however, so you'll have to boot your utility flash drive again if you want to boot any other Windows media (or otherwise execute the dmpstore command).
If everything's right, you should be booting into Windows 10X, and your graphics adapter might even be working.
Dual booting legacy Windows 10 with Windows 10X
| Created: February 15, 2020 | Last Update: January 21, 2021 |
|---|---|
| Authors: | Gustave Monce |
| Status: | Draft |
| Supported Windows 10X Version: | 195xx |
This guide will assume you have properly installed Windows 10X before using the instructions provided in this book with no step skipped.
Note: This guide has not been updated to support dual booting Windows 10X version 20279 with Windows 10 yet.
Prerequisites
- An host computer
- The target computer running Windows 10X
- Your utility flash drive (UFD)
- An installation media of Windows 10 build 195xx (or higher)
- An usb driver with the installation files of said Windows 10 build
Preparing the pool
Boot the target computer into your UFD, and make sure you're in the command prompt. Verify using diskpart that you see all space partitions on disk (MainOS, Data, OSData...) by using
diskpart

# this will list all volumes and show MainOS, Data...
list vol

# exiting diskpart
exit
Once verified, you can start preparing the pool to accomodate for legacy Windows 10.
Run the following commands to create the new partition that will host legacy Windows 10:
spaceutil new-space -PoolName OSPool -Name "DesktopOSDisk" -ProvisionedCapacity 128G -MinFdType Drive -MaxFdType Drive -ResiliencyType Simple -FaultTolerance 0 -NumberOfCopies 1 -NumberOfGroups 1 -NumberOfColumns 1 -WriteCacheSize 0 -ReadCacheSize 0 -Flags System Active
spaceutil Set-Space -PoolName OSPool -Name "DesktopOSDisk" -IsSystem true -IsActive true
spaceutil Attach-Space -PoolName OSPool -Name "DesktopOSDisk"
At this point you should start seeing a new disk in diskpart, usually it is the latest one. Verify that no partition is present on it, if that's the case, you found the right one. We will assume in the rest of this guide that the disk id found earlier is 25.
Execute the following commands in diskpart:
# replace 25 with your id!
select disk 25
convert gpt
crea part pri
format fs=NTFS label=DesktopOS quick
assign
# this will tell you the drive letter assigned
detail part
# exiting diskpart
exit
We will assume in the rest of this guide, your mountpoint is W: for DesktopOS.
Adding the required boot entry
In command prompt, go back to diskpart again and try to find the VIRT_EFIESP partition, you can find it by using the list volume command. Here we will assume the id is 15.
Execute the following commands:
diskpart
# replace 15 with the id you found earlier for VIRT_EFIESP!
select volume 15
assign
# this will tell you the drive letter it assigned
list volume
# exiting diskpart
exit
We will assume we mounted VIRT_EFIESP as Z: here
Execute the following commands:
Z:
cd efi\microsoft\boot
bcdedit /store BCD /displayorder {default}
# this will tell you the new guid, here we assume that was {276291b0-e55c-48d7-a87f-9cb79facba1a} replace this in all subsequent commands
bcdedit /store BCD /copy {default} /d "DesktopOS"
# make sure to replace W: with the drive letter for DesktopOS!
bcdedit /store BCD /set {276291b0-e55c-48d7-a87f-9cb79facba1a} device partition=W:
bcdedit /store BCD /set {276291b0-e55c-48d7-a87f-9cb79facba1a} osdevice partition=W:
bcdedit /store BCD /set {276291b0-e55c-48d7-a87f-9cb79facba1a} testsigning on
bcdedit /store BCD /set {276291b0-e55c-48d7-a87f-9cb79facba1a} nointegritychecks on
bcdedit /store BCD /set {276291b0-e55c-48d7-a87f-9cb79facba1a} flightsigning on

# optional (your windows 10 may be state separated without these command ran before boot)
bcdedit /store BCD /deletevalue {276291b0-e55c-48d7-a87f-9cb79facba1a} bspdevice
bcdedit /store BCD /deletevalue {276291b0-e55c-48d7-a87f-9cb79facba1a} osdatadevice

bcdedit /store BCD /set {bootmgr} displaybootmenu on
bcdedit /store BCD /set {bootmgr} timeout 15
Applying Desktop
Now find your install.wim legacy Windows 10 image, we assume here we included the windows 10 installation media and it's mounted as the drive letter U:, so our wim is located in U:\sources\install.wim
Run the following commands (do not forget to replace letter paths, W: here is our DesktopOS partition!)
dism /Apply-Image /ImageFile:U:\sources\install.wim /Index:1 /ApplyDir:W:
Final notes
You can now reboot your machine, you'll be present with a selection between MAINOS and DesktopOS, MAINOS will boot into 10X, DesktopOS will boot into desktop, if you get a signature verifcation error, press F8 in the boot menu once it shows up and when it tells you you can do so, and press 7 on your keyboard, windows 10 will load.
Creating a pool from scratch
REM value in GB
set TARGET_SIZE=128

set DriveID=0

spaceutil New-Pool -DriveNumber %DriveID% -Name OSPool -CompatibleVersion "Windows 19H1" -MetadataLength 64M -Threshold 70 -ZeroOnDeallocate False -IsPowerProtected False -RapidRegeneration False -RetireMissingDrives Auto -MinimumAllocationSize 1M -DefaultProvisioningType Thin -DefaultMinFdType Drive -DefaultMaxFdType Drive -DefaultResiliencyType Simple -DefaultReadCacheSize 0

spaceutil New-Space -PoolName OSPool -Name "IU_RESERVE_DISK" -ProvisionedCapacity 2G -MinFdType Drive -MaxFdType Drive -ResiliencyType Simple -FaultTolerance 0 -NumberOfCopies 1 -NumberOfGroups 1 -NumberOfColumns 1 -WriteCacheSize 0 -ReadCacheSize 0 -Flags System Active
spaceutil Set-Space -PoolName OSPool -Name "IU_RESERVE_DISK" -IsSystem true -IsActive true
spaceutil Attach-Space -PoolName OSPool -Name "IU_RESERVE_DISK"

spaceutil New-Space -PoolName OSPool -Name "SERVICING_STAGING_ROOTDISK" -ProvisionedCapacity 10G -MinFdType Drive -MaxFdType Drive -ResiliencyType Simple -FaultTolerance 0 -NumberOfCopies 1 -NumberOfGroups 1 -NumberOfColumns 1 -WriteCacheSize 0 -ReadCacheSize 0
spaceutil Attach-Space -PoolName OSPool -Name "SERVICING_STAGING_ROOTDISK"

spaceutil New-Space -PoolName OSPool -Name "PreInstalledDisk" -ProvisionedCapacity %TARGET_SIZE%G -MinFdType Drive -MaxFdType Drive -ResiliencyType Simple -FaultTolerance 0 -NumberOfCopies 1 -NumberOfGroups 1 -NumberOfColumns 1 -WriteCacheSize 0 -ReadCacheSize 0 -Flags System Active
spaceutil Set-Space -PoolName OSPool -Name "PreInstalledDisk" -IsSystem true -IsActive true
spaceutil Attach-Space -PoolName OSPool -Name "PreInstalledDisk"

spaceutil New-Space -PoolName OSPool -Name "EFIESPDisk" -ProvisionedCapacity %TARGET_SIZE%G -MinFdType Drive -MaxFdType Drive -ResiliencyType Simple -FaultTolerance 0 -NumberOfCopies 1 -NumberOfGroups 1 -NumberOfColumns 1 -WriteCacheSize 0 -ReadCacheSize 0 -Flags System Active
spaceutil Set-Space -PoolName OSPool -Name "EFIESPDisk" -IsSystem true -IsActive true
spaceutil Attach-Space -PoolName OSPool -Name "EFIESPDisk"

spaceutil New-Space -PoolName OSPool -Name "VIRT_EFIESPDisk" -ProvisionedCapacity 1G -MinFdType Drive -MaxFdType Drive -ResiliencyType Simple -FaultTolerance 0 -NumberOfCopies 1 -NumberOfGroups 1 -NumberOfColumns 1 -WriteCacheSize 0 -ReadCacheSize 0 -Flags System Active
spaceutil Set-Space -PoolName OSPool -Name "VIRT_EFIESPDisk" -IsSystem true -IsActive true
spaceutil Attach-Space -PoolName OSPool -Name "VIRT_EFIESPDisk"

spaceutil New-Space -PoolName OSPool -Name "SERVICING_FILESDISK" -ProvisionedCapacity 10G -MinFdType Drive -MaxFdType Drive -ResiliencyType Simple -FaultTolerance 0 -NumberOfCopies 1 -NumberOfGroups 1 -NumberOfColumns 1 -WriteCacheSize 0 -ReadCacheSize 0 -Flags System Active
spaceutil Set-Space -PoolName OSPool -Name "SERVICING_FILESDISK" -IsSystem true -IsActive true
spaceutil Attach-Space -PoolName OSPool -Name "SERVICING_FILESDISK"

spaceutil New-Space -PoolName OSPool -Name "BSPDisk" -ProvisionedCapacity %TARGET_SIZE%G -MinFdType Drive -MaxFdType Drive -ResiliencyType Simple -FaultTolerance 0 -NumberOfCopies 1 -NumberOfGroups 1 -NumberOfColumns 1 -WriteCacheSize 0 -ReadCacheSize 0 -Flags System Active
spaceutil Set-Space -PoolName OSPool -Name "BSPDisk" -IsSystem true -IsActive true
spaceutil Attach-Space -PoolName OSPool -Name "BSPDisk"

spaceutil New-Space -PoolName OSPool -Name "SERVICING_METADATADisk" -ProvisionedCapacity 256MB -MinFdType Drive -MaxFdType Drive -ResiliencyType Simple -FaultTolerance 0 -NumberOfCopies 1 -NumberOfGroups 1 -NumberOfColumns 1 -WriteCacheSize 0 -ReadCacheSize 0 -Flags System Active
spaceutil Set-Space -PoolName OSPool -Name "SERVICING_METADATADisk" -IsSystem true -IsActive true
spaceutil Attach-Space -PoolName OSPool -Name "SERVICING_METADATADisk"

spaceutil New-Space -PoolName OSPool -Name "VailContainer" -ProvisionedCapacity %TARGET_SIZE%G -MinFdType Drive -MaxFdType Drive -ResiliencyType Simple -FaultTolerance 0 -NumberOfCopies 1 -NumberOfGroups 1 -NumberOfColumns 1 -WriteCacheSize 0 -ReadCacheSize 0 -Flags System
spaceutil Set-Space -PoolName OSPool -Name "VailContainer" -IsSystem true

spaceutil New-Space -PoolName OSPool -Name "OSDataDisk" -ProvisionedCapacity %TARGET_SIZE%G -MinFdType Drive -MaxFdType Drive -ResiliencyType Simple -FaultTolerance 0 -NumberOfCopies 1 -NumberOfGroups 1 -NumberOfColumns 1 -WriteCacheSize 0 -ReadCacheSize 0 -Flags System Active
spaceutil Set-Space -PoolName OSPool -Name "OSDataDisk" -IsSystem true -IsActive true
spaceutil Attach-Space -PoolName OSPool -Name "OSDataDisk"

spaceutil New-Space -PoolName OSPool -Name "DataDisk" -ProvisionedCapacity %TARGET_SIZE%G -MinFdType Drive -MaxFdType Drive -ResiliencyType Simple -FaultTolerance 0 -NumberOfCopies 1 -NumberOfGroups 1 -NumberOfColumns 1 -WriteCacheSize 0 -ReadCacheSize 0 -Flags System Active
spaceutil Set-Space -PoolName OSPool -Name "DataDisk" -IsSystem true -IsActive true
spaceutil Attach-Space -PoolName OSPool -Name "DataDisk"

spaceutil New-Space -PoolName OSPool -Name "MainOSDisk" -ProvisionedCapacity %TARGET_SIZE%G -MinFdType Drive -MaxFdType Drive -ResiliencyType Simple -FaultTolerance 0 -NumberOfCopies 1 -NumberOfGroups 1 -NumberOfColumns 1 -WriteCacheSize 0 -ReadCacheSize 0 -Flags System Active
spaceutil Set-Space -PoolName OSPool -Name "MainOSDisk" -IsSystem true -IsActive true
spaceutil Attach-Space -PoolName OSPool -Name "MainOSDisk"

spaceutil New-Space -PoolName OSPool -Name "Container Manager Persisted Storage" -ProvisionedCapacity %TARGET_SIZE%G -MinFdType Drive -MaxFdType Drive -ResiliencyType Simple -FaultTolerance 0 -NumberOfCopies 1 -NumberOfGroups 1 -NumberOfColumns 1 -WriteCacheSize 0 -ReadCacheSize 0 -Flags System
spaceutil Set-Space -PoolName OSPool -Name "Container Manager Persisted Storage" -IsSystem true
Installing Windows 10X (from cabs) on real hardware
| Created: January 18, 2021 | Last Update: February 2, 2021 |
|---|---|
| Authors: | NT Authority, Albacore, Gustave Monce, Rafael Rivera, Daniel Kornev |
| Status: | Draft |
| Supported Windows 10X Version: | 20279 |
Disclaimer: Some drivers may fail to load, the guide will be updated with extra tips on extending driver compatibility later
Overview
Here's some quick notes on installing Windows 10X on real hardware from cabs. For this example, we're assuming a system with no other critical disks installed, and a helpful host system being around to set up the initial image.
This guide has been created for the 20279 version of Windows 10X.
Prerequisites
Host
- Windows 10 Iron or Cobalt (20279 or 21xxx+) - though 20H2 can also work just fine
- Utility USB flash drive of ~8GB+
Target
- Graphics card with DCHU drivers available
- UEFI system firmware with the ability to disable Secure Boot
- Boot drive larger than 100 GiB
- Learn how to disable Secure Boot in your device, and change its boot order to allow booting from the USB Flash Drive
Peripherals
Note: If your device doesn't have a built-in Ethernet adapter, prepare an external Ethernet adapter (USB/USB-C/USB-C Hub with Ethernet). You won't be able to pass through the OOBE without internet connection.
Common: Files & Tools
Workspace
- Create a folder called 10X in the root of your drive, e.g,
C:\10X - Create a subfolder called
Sources - Create a subfolder called
DCHUDrivers - Use v0.3.0.0. release of the Gus's UUPMediaCreator(https://github.com/gus33000/UUPMediaCreator)) to download bits by typing this command in the Command Prompt (where
dlfolderis the place to put downloaded bits, e.g.,C:\10X\dlfolder, andamd64specifies the architecture; you can specifyarm64for ARM64 build of Windows 10X):
uupdownload -o dlfolder -s Lite -t amd64 -r External -b Dev -a CB -c fe_release_10x -v 10.0.20279.1002
Note: you can use -z Test param to download Test build of Windows 10X which includes non-production components.
- Put them into
Sourcesfolder (e.g.,C:\10X\Sources) - Make sure that bits are in
Sourcesfolder directly (\10X\Sources\*compdb*.cabshould be at this level) -
Download
overlay.zipfrom Rafael - Unpack it to your
Sourcesfolder (e.g.,C:\10X\Sources) - Open command line in the
Sourcesfolder and runfixup.cmdin it - Copy the appx folder from it to the root of your packages folder (
C:\10X\Sources) - Move
FMfolder from\10X\Sourcesto\10X - Move
OEMInput.xmlfrom\10X\Sourcesto\10X - Your resulting folder structure should look like this:
(disk root)
|
-----10X
     |
     ------DCHUDrivers
     ------FM
     ------Sources
           |
           -----appx (includes folders for each AppX)
           -----Retail
                |
                -----%Architecture_Name% (e.g., AMD64)
                     |
                     -----fre (includes the rest of the cabs)
           -----(several top-most cabs with compdb in the name, and .uupmcreplay file)
     ------OEMInput.xml
Install Tools
Note: Both ADK and WinPE should have the same or higher version as your Windows 10X Image.
- [Optional] If you have previous kits (e.g., WP8 Tools), remove them
-
Download the ADK Insider Preview ISO for your host OS version (only tested with
Windows_InsiderPreview_ADK_en-us_20279.iso) - Install Deployment Tools, ICD, Configuration Designer, and uncheck the rest if possible/as needed
- Download the Windows Preinstallation Environment ISO for your host OS version (only tested with 20279 version)
- Install Windows Preinstallation Environment
Configure Your BSP
Board Support Packages (BSP) is a collection of drivers/settings required to run Windows 10X on a hardware platform. The BSP also includes a set of device drivers that are specific to the components/silicon used in the device, mostly in the form of .inf files and their associated .sys/.dll files.
You will need a BSP for your device if you want it to use all of its devices (WiFi, Cameras, etc.).
To configure your BSP, you need to obtain DCH (Universal) Drivers for your device, and then prepare the OEMDriversFM.xml feature manifest XML file with the links to your drivers.
Prepare DCHU Drivers for Your Hardware
- Obtain DCHU Drivers for your hardware (especially GPU)
- Find all infs that contain "firmware update" in them and remove them
- Copy all remaining drivers to your
DCHUDriverssubfolder (\10X\DCHUDrivers)
Form A BSP for Your Hardware
- Use
OEMDriversFM.xmlexample from Albacore
	<?xml version="1.0" encoding="utf-8"?>
	<FeatureManifest Revision="1" SchemaVersion="1.2" xmlns:xsd="http://www.w3.org/2001/XMLSchema" xmlns:xsi="http://www.w3.org/2001/XMLSchema-instance" xmlns="http://schemas.microsoft.com/embedded/2004/10/ImageUpdate">
		<Drivers>
			<BaseDriverPackages>
				<DriverPackageFile Path="C:\10X\DCHUDrivers\WcosGraphicsDriver.Intel\bin\Drivers\iigd_oc" Name="iigd_dc_base.inf"/>
			</BaseDriverPackages>
		</Drivers>
	</FeatureManifest>
- For each of your drivers put a link to it in the form like one above.
Configure Your Image
- Edit
OEMInput.xml(remove VM_*, uncomment UEFI_Hardware line, add/remove features etc.) - Add a link to your BSP (
OEMDriversFM.xml) to yourOEMInput.xmllike this:
<?xml version="1.0" encoding="utf-8"?>
<OEMInput xmlns:xsi="http://www.w3.org/2001/XMLSchema-instance" xmlns:xsd="http://www.w3.org/2001/XMLSchema" xmlns="http://schemas.microsoft.com/embedded/2019/06/ImageUpdate">
  <Description></Description>
  <DeviceLayoutType>GPT_SPACES_512</DeviceLayoutType>
  <SV>Microsoft</SV>
  <Device>GenericUEFIDevice</Device>
  <ReleaseType>Test</ReleaseType>
  <BuildType>fre</BuildType>
  <Languages>
    <Language Default="true">en-us</Language>
  </Languages>
  <AdditionalFMs>
	  <!--Windows 10X Feature Manifests-->
	  <AdditionalFM>c:\10X\FM\WindowsCoreProductionFM.xml</AdditionalFM>
	  <!-- Your BSMBSP -->
	  <AdditionalFM>c:\10X\OEMDriversFM.xml</AdditionalFM>
  </AdditionalFMs>
</OEMInput>
Build Your Image
- Prepare your environment:
Start > open elevated *Deployment and Imaging Tools Environment
- In that window, type this (where
C:\is the drive where your Windows 10 Insider Preview ADK is installed):
C:\> cd c:\Program Files (x86)\Windows Kits\10\Tools\bin\i386
- Run this command to unregister the imaging toolchain overrides (unless you use a non-production machine):
C:\> "%ProgramFiles(x86)%\Windows Kits\10\Assessment and Deployment Kit\Deployment Tools\%PROCESSOR_ARCHITECTURE%\DISM\wimmountadksetup%PROCESSOR_ARCHITECTURE%.exe" /q /uninstall
- Run
IMGGENin your Command Prompt window (give a name to your ffu, e.g.,SurfaceGo.ffuif your device is Surface Go). Important: Use absolute paths both in files (OEMInput.xml&OEMDriversFM.xml) AND in the command line:
C:\> imggen c:\10X\SurfaceGo.ffu C:\10X\OEMInput.xml C:\10X\Sources AMD64
Prepare USB Drive for Flashing
Note: You can follow Microsoft docs (Part I: Create Multipartition USB Drive, Part II: Install WinPE), or you can follow these instructions (taken from the docs):
- Get an empty Flash drive (with size at least 8GB)
- In the same Deployment and Imaging Tools Environment's elevated Command Prompt window open diskpart and press
Enter - Follow these instructions to create two disks:
List disk
select disk X (where X is your USB drive)
clean
create partition primary size=2048
active
format fs=FAT32 quick label="WinPE"
assign letter=P
create partition primary
format fs=NTFS quick label="Images"
assign letter=I
exit
- Create Working WinPE files by using this command (where
C:\WinPE_amd64is the location of your choice):
copype amd64 C:\WinPE_amd64
- Create bootable media with it (where
P:is the letter of the FAT32 partition of your USB Flash drive):
MakeWinPEMedia /UFD C:\WinPE_amd64 P:
- Copy your Image (
.ffufile) to theI:drive (the second partition of your Flash drive formatted with NTFS) - Download and add
gdisk64.exefile to the root of your WinPE partition (P:in this example)
Apply Your Image
Apply Your Image on Machine Without Windows 10X Installed On It
- Boot from WinPE drive
- Open diskpart
- Type this:
list disk
Take a note of the name of your device's main disk drive, e.g., disk 0
4. Type exit to leave diskpart
5. Use this command (and specify the correct path to the ffu that you created above, as well the id of your physical drive):
dism /apply-ffu /imagefile:C:\YourDevice.ffu /applydrive:\\.\physicaldrive0
- Once complete, remove your USB flash drive
- Type exit in the Command Prompt window
Apply Your Image on Machine With Windows 10X Installed On It
- Boot from WinPE drive
- Type notepad to open notepad
- Use
File-->Opento find the name of your WinPE disk - Type this to identify the id of your physical drive:
spaceutil get-drive -poolname ospool
- Type this (where
D:\is the name of your WinPE disk and0in the end ofphysicaldrive0is the id of your physical drive):
cd D:\
gdisk64 -l \\.\physicaldrive0
- Make sure that it contains OSPool and other partitions of Windows 10X
- Type this to clean up the drive (where
0in the end ofphysicaldrive0is the id of your physical drive):
gdisk64 \\.\physicaldrive0
o
w
and press Enter
- Use this command (and specify the correct path to the ffu that you created above, as well the id of your physical drive):
dism /apply-ffu /imagefile:C:\YourDevice.ffu /applydrive:\\.\physicaldrive0
- Once complete, remove your USB flash drive
- Type exit in the Command Prompt window
Load Windows 10X
At this time, your Windows 10X will boot. If everything is correct you should see the OOBE.
Installing Windows 10X (from cabs with Device Image Generator) on real hardware
| Created: February 2, 2021 | Last Update: February 4, 2021 |
|---|---|
| Authors: | NT Authority, Albacore, Gustave Monce, Rafael Rivera, Daniel Kornev |
| Status: | Draft |
| Supported Windows 10X Version: | 20279 |
Disclaimer: Some drivers may fail to load, the guide will be updated with extra tips on extending driver compatibility later
Overview
Here's some quick notes on installing Windows 10X on real hardware from cabs using the user-friendly Device Image Generator made by Albacore. For this example, we're assuming a system with no other critical disks installed, and a helpful host system being around to set up the initial image.
This guide has been created for the 20279 version of Windows 10X.
Prerequisites
Host
- Windows 10 Iron or Cobalt (20279 or 21xxx+) - though 20H2 can also work just fine
- Utility USB flash drive of ~8GB+
Target
- Graphics card with DCHU drivers available
- UEFI system firmware with the ability to disable Secure Boot
- Boot drive larger than 100 GiB
- Learn how to disable Secure Boot in your device, and change its boot order to allow booting from the USB Flash Drive
Peripherals
Note: If your device doesn't have a built-in Ethernet adapter, prepare an external Ethernet adapter (USB/USB-C/USB-C Hub with Ethernet). You won't be able to pass through the OOBE without internet connection.
Common: Files & Tools
Workspace
- Create a folder called 10X in the root of your drive, e.g,
C:\10X - Create a subfolder called
Sources - If you are running on a machine that is not the target machine (the one you want to flash Windows 10X onto) create a subfolder called
DCHUDrivers - Use v0.3.0.0. release of the Gus's UUPMediaCreator(https://github.com/gus33000/UUPMediaCreator)) to download bits by typing this command in the Command Prompt (where
dlfolderis the place to put downloaded bits, e.g.,C:\10X\dlfolder, andamd64specifies the architecture; you can specifyarm64for ARM64 build of Windows 10X):
uupdownload -o dlfolder -s Lite -t amd64 -r External -b Dev -a CB -c fe_release_10x -v 10.0.20279.1002 -z test
Note: you must use -z Test param to download Test build of Windows 10X which includes non-production components.
- Put them into
Sourcesfolder (e.g.,C:\10X\Sources) - Make sure that bits are in
Sourcesfolder directly (\10X\Sources\*compdb*.cabshould be at this level) -
Download
overlay.zipfrom Rafael - Unpack it to your
Sourcesfolder (e.g.,C:\10X\Sources) - Open command line in the
Sourcesfolder and runfixup.cmdin it - Copy the appx folder from the downloaded folder (with bits) to the root of your packages folder (e.g.,
C:\10X\Sources) - Create
Toolsfolder - Create
Devicesfolder - Create
FFUsfolder - Create
FMFilesfolder - Extract
FM.xmlfiles from all CABs that contain FM~ in their name into a folder calledFMFilesby using this command (thanks to Steve Troughton-Smith (Tweet)):
expand -i Sources\Retail\AMD64\fre\*FM~*.cab -f:*FM.xml Sources\FMFiles\
- Your resulting folder structure should look like this:
(disk root)
|
-----10X
     |
     ------DCHUDrivers (only if your target machine differs from the one you will build this image)
     ------FMFiles
     ------Sources
           |
           -----appx (includes folders for each AppX)
           -----Retail
                |
                -----%Architecture_Name% (e.g., AMD64)
                     |
                     -----fre (includes the rest of the cabs)
           -----(several top-most cabs with compdb in the name, and .uupmcreplay file)
     ------Tools
     ------Devices
     ------FFUs
Install Tools
Note: Both ADK and WinPE should have the same or higher version as your Windows 10X Image.
- [Optional] If you have previous kits (e.g., WP8 Tools), remove them
-
Download the ADK Insider Preview ISO for your host OS version (only tested with
Windows_InsiderPreview_ADK_en-us_20279.iso) - Install Deployment Tools, ICD, Configuration Designer, and uncheck the rest if possible/as needed
- Download the Windows Preinstallation Environment ISO for your host OS version (only tested with 20279 version)
- Install Windows Preinstallation Environment
- Download Windows Image Generator (see tweet)
- Unpack it to
(disk root)\10X\Tools - Download updates to it
- Unpack it over the existing files to
(disk root)\10X\Tools
Configure Your BSP
Board Support Packages (BSP) is a collection of drivers/settings required to run Windows 10X on a hardware platform. The BSP also includes a set of device drivers that are specific to the components/silicon used in the device, mostly in the form of .inf files and their associated .sys/.dll files.
You will need a BSP for your device if you want it to use all of its devices (WiFi, Cameras, etc.).
To configure your BSP, you need to obtain DCH (Universal) Drivers for your device, and then prepare the OEMDriversFM.xml feature manifest XML file with the links to your drivers.
Prepare DCHU Drivers for Your Hardware
Common Steps
- Go to
(disk root)\10X\Tools\and openDevImgGen.exe
Extracting Drivers From Your Target Machine
This is the case when your target machine is the same you're building this image on.
Example: you have Surface Pro 6 and you want to flash it with Windows 10X. You use Device Image Generator to extract current drivers from your Windows 10 machine.
- In the Windows Device Image Generator use the first menu option ("Export drivers from this PC") to extract drivers from the current machine
- Specify location for storing your drivers package in the opened window to
10X\Devices
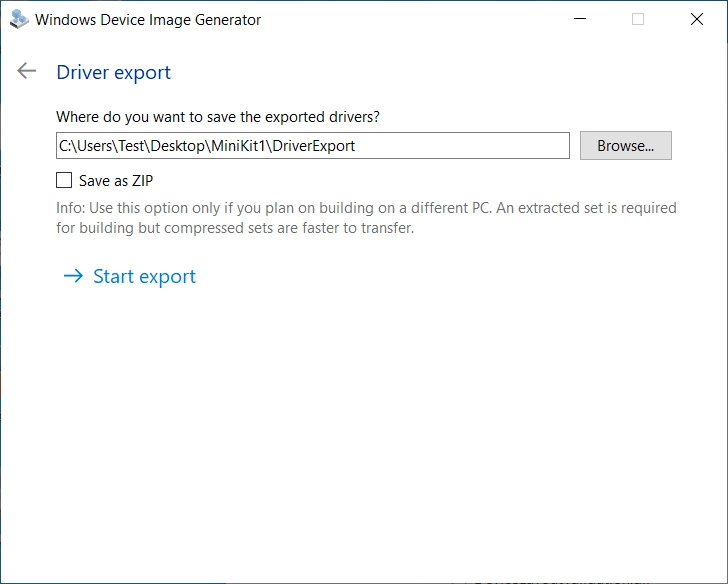
- Click on "Start export"
Using Downloaded Drivers
This is the case when your target machine is different from the one you're building this image on.
Example: you have Surface Pro 6 and Surface Go. You want to flash your Surface Go with Windows 10X. You use Device Image Generator to generate device driver package from the drivers you've downloaded for your Surface Go.
- Obtain DCHU Drivers for your hardware (especially GPU)
- In the Windows Device Image Generator use the second menu option to generate device drivers package from your DCHU drivers folder
- In the "Create configuration packages" specify location of your DCHU drivers (
(disk root)\10X\DCHUDrivers), and specify location for storing your drivers package in the opened window to10X\Devices - Click "Process drivers"
[Optional] Edit A BSP for Your Hardware
This is only needed if some of the devices shall not be used.
- Use
DeviceDriversPackageFM.xmlgenerated by the Device Image Generator, located at(disk root)\10X\Devicesand comment out items that shall not be used:
	<?xml version="1.0" encoding="utf-8"?>
	<FeatureManifest Revision="1" SchemaVersion="1.2" xmlns:xsd="http://www.w3.org/2001/XMLSchema" xmlns:xsi="http://www.w3.org/2001/XMLSchema-instance" xmlns="http://schemas.microsoft.com/embedded/2004/10/ImageUpdate">
		<Drivers>
			<BaseDriverPackages>
				<DriverPackageFile Path="C:\10X\DCHUDrivers\Intel\bin\Drivers\iigd_oc" Name="iigd_dc_base.inf"/>
				<!-- <DriverPackageFile Path="C:\10X\DCHUDrivers\SurfaceACPIBattery\bin\Drivers\iigd_oc" Name="SurfaceACPIBattery.inf"/>-->
				<DriverPackageFile Path="C:\10X\DCHUDrivers\SurfacePen\bin\Drivers\SurfacePen" Name="SurfacePen.inf"/>
			</BaseDriverPackages>
		</Drivers>
	</FeatureManifest>
Note: If your target machine is Surface Go, remove reference to SurfaceACPIBattery.inf.
[Optional] Configure Your Image
Note: Not yet supported by the tool (OEMInput.xml is generated on the fly currently).
- Edit
OEMInput.xmlif needed.
Build Your Image
- Prepare your environment:
Start > open elevated *Deployment and Imaging Tools Environment
- In that window, type this (where
C:\is the drive where your Windows 10 Insider Preview ADK is installed):
C:\> cd c:\Program Files (x86)\Windows Kits\10\Tools\bin\i386
- Unless you use a non-prod machine, run this command to unregister the imaging toolchain overrides:
C:\> "%ProgramFiles(x86)%\Windows Kits\10\Assessment and Deployment Kit\Deployment Tools\%PROCESSOR_ARCHITECTURE%\DISM\wimmountadksetup%PROCESSOR_ARCHITECTURE%.exe" /q /uninstall
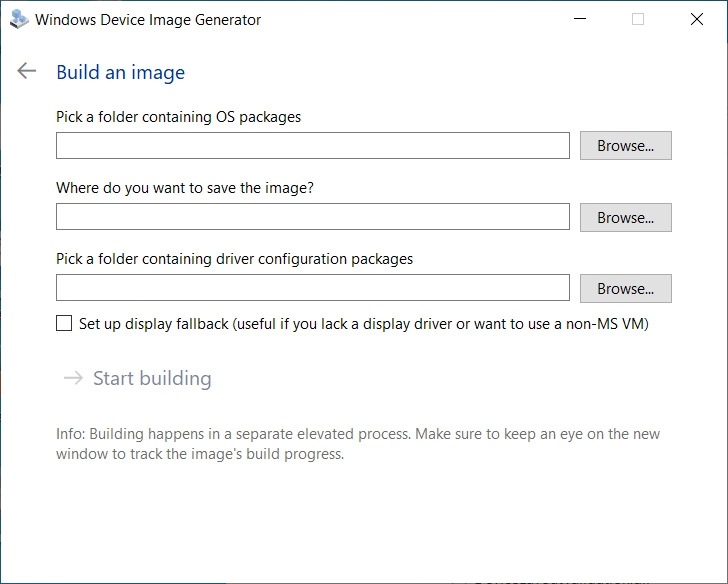
- Use third option in the Windows Device Image Generator to begin generation of your Image (ffu). Use
(disk root)\10X\Sourcesas the location of OS packages. Use(disk root)\10X\FFUsfolder for storing your resulting FFU. Use(disk root)\10X\Devicesas the location of your driver configuration packages. - Click on "Start building", and make sure to allow the separate elevated process to start. It will start the process of building the image.
Prepare USB Drive for Flashing
Note: You can follow Microsoft docs (Part I: Create Multipartition USB Drive, Part II: Install WinPE), or you can follow these instructions (taken from the docs):
- Get an empty Flash drive (with size at least 8GB)
- In the same Deployment and Imaging Tools Environment's elevated Command Prompt window open diskpart and press
Enter - Follow these instructions to create two disks:
List disk
select disk X (where X is your USB drive)
clean
create partition primary size=2048
active
format fs=FAT32 quick label="WinPE"
assign letter=P
create partition primary
format fs=NTFS quick label="Images"
assign letter=I
exit
- Create Working WinPE files by using this command (where
C:\WinPE_amd64is the location of your choice):
copype amd64 C:\WinPE_amd64
- Create bootable media with it (where
P:is the letter of the FAT32 partition of your USB Flash drive):
MakeWinPEMedia /UFD C:\WinPE_amd64 P:
- Copy your Image (
.ffufile) to theI:drive (the second partition of your Flash drive formatted with NTFS) - Download and add
gdisk64.exefile to the root of your WinPE partition (P:in this example)
Apply Your Image
Apply Your Image on Machine Without Windows 10X Installed On It
- Boot from WinPE drive
- Open diskpart
- Type this:
list disk
Take a note of the name of your device's main disk drive, e.g., disk 0
4. Type exit to leave diskpart
5. Use this command (and specify the correct path to the ffu that you created above, as well the id of your physical drive):
dism /apply-ffu /imagefile:C:\\YourDevice.ffu /applydrive:\\.\physicaldrive0
- Once complete, remove your USB flash drive
- Type exit in the Command Prompt window
Apply Your Image on Machine With Windows 10X Installed On It
- Boot from WinPE drive
- Type notepad to open notepad
- Use
File-->Opento find the name of your WinPE disk - Type this to identify the id of your physical drive:
spaceutil get-drive -poolname ospool
- Type this (where
D:\is the name of your WinPE disk and0in the end ofphysicaldrive0is the id of your physical drive):
cd D:\
gdisk64 -l \\.\physicaldrive0
- Make sure that it contains OSPool and other partitions of Windows 10X
- Type this to clean up the drive (where
0in the end ofphysicaldrive0is the id of your physical drive):
gdisk64 \\.\physicaldrive0
o
w
and press Enter
- Use this command (and specify the correct path to the ffu that you created above, as well the id of your physical drive):
dism /apply-ffu /imagefile:C:\YourDevice.ffu /applydrive:\\.\physicaldrive0
- Once complete, remove your USB flash drive
- Type exit in the Command Prompt window
Load Windows 10X
At this time, your Windows 10X will boot. If everything is correct you should see the OOBE.
Reverting 10X boot restrictions & returning to classic 10
Prerequisites
- A Windows 10 Setup USB of an identical or higher version than the 10X build you've used
- For example if you're on 10X build 20279, you'll want Windows 10 Insider Preview build 20279 or newer (download here)
- An x64 EFI shell (click here to download)
- gdisk64.exe (extract from ZIP) (click here to download)
Before you begin, make sure Secure Boot is turned off on the machine you wish to roll back to classic 10
Tweak USB contents
- Plug in the setup USB drive
- Navigate to
efi\bootinside your USB drive - Rename the existing
bootx64.efifile towinx64.efi - Copy the EFI shell file you've downloaded to that directory and rename it to
bootx64.efi - Create a file on the root of your USB drive called
startup.nshand open it in Notepad - Paste this text into Notepad and save the file:
dmpstore -d SecureBootPlatformID -guid 77FA9ABD-0359-4D32-BD60-28F4E78F784B fs0:\efi\boot\winx64.efi fs1:\efi\boot\winx64.efi fs2:\efi\boot\winx64.efi fs3:\efi\boot\winx64.efi fs4:\efi\boot\winx64.efi fs5:\efi\boot\winx64.efi fs6:\efi\boot\winx64.efi fs7:\efi\boot\winx64.efi fs8:\efi\boot\winx64.efi fs9:\efi\boot\winx64.efi fsA:\efi\boot\winx64.efi - Copy gdisk64.exe to the root of your USB drive
- The USB drive is now ready to use
Extra troubleshooting
Recent devices with Intel Pentium (Gold) chips that use Insyde BIOS are prone to entering a faulty Secure Boot state, resulting in the machine booting to a black screen with Security Boot Fail written in the middle, even though UEFI says Secure Boot is off. To fix this issue, do the following:
- Turn Secure Boot on
- Save changes and boot to UEFI settings again
- Turn Secure Boot off
- Secure Boot should now be fully disabled
Erasing the Windows 10X disk layout
- Boot your Windows Setup USB
- Press Shift-F10 to open the Command Prompt
- If nothing happens, you may need to also press the Fn key if your keyboard has one
- Find the drive letter of your USB drive (for example
D:)- An easy way to do this is to run Notepad and use the File>Open menu item, then go to This PC and look for it
- Navigate to it using this command (don't forget to use the appropriate letter for your own USB)
D:
- Run spaceutil to find the ID of your physical drive
spaceutil get-drive -poolname ospool
- In spaceutil's output look for the
####column, the value can for example be0 - Double check that the ID is correct by running gdisk64
- Don't forget to change
Xin the command to the ID of your drive
- Don't forget to change
gdisk64 -l \\.\physicaldriveX
- Make sure that the output of gdisk64 contains OSPool and other partitions of Windows 10X
- Use gdisk64 to clean up the drive using the following commands
- Don't forget to change
Xin the command to the ID of your drive
- Don't forget to change
gdisk64 \\.\physicaldriveX
o
w
then press Enter
- Type
exitto close the Command Prompt
You can now continue installing Windows 10 like you usually would
Installing Windows 10X 20279 (emulator image) on real hardware
| Created: February 12, 2020 | Last Update: November 25, 2022 |
|---|---|
| Authors: | NT Authority, Albacore, Gustave Monce, Rafael Rivera, Daniel Kornev |
| Status: | Draft |
| Supported Windows 10X Versions: | 20279 (partially) |
Here's some quick notes on installing Windows 10X on real hardware from emulator image or a prepared VHDX. For this example, we're assuming a system with no other critical disks installed, and a helpful host system being around to set up the initial image.
The guide has been updated for the 20279 image recently provided by @thebookisclosed. Ideally, you'd build your own .ffu image from the .cabs.
Here's a link to Unofficial Guide to Build Windows 10X .ffu Image & Apply To Real Hardware.
Prerequisites
Host
- Windows 10 Iron or Cobalt (20279 or 21xxx+).
- Utility USB flash drive of ~32GB+.
Target
- CPU
with Hyper-V support for VAIL. No VAIL in the newer build. - Graphics card with DCHU drivers available.
- UEFI system firmware with the ability to disable Secure Boot.
- Boot drive larger than 128 GiB. An 128 GB SSD usually isn't.
- Preferred: 4Kn boot drive. We'll provide steps a bit later for converting the image.
Host work
Fetch and mount the emulator image
Make sure you have a clean .vhdx from the download link, which we shall refer to as Flash.vhdx from now on. Copy it someplace, and preferably keep another backup as well.
Mount it using PowerShell (as administrator):
Mount-VHD "X:\WCOS\Flash.vhdx"
Check if the emulator image is mounted correctly:
Get-StoragePool -FriendlyName OSPool
This should look like the following:
FriendlyName OperationalStatus HealthStatus IsPrimordial IsReadOnly     Size AllocatedSize
------------ ----------------- ------------ ------------ ----------     ---- -------------
OSPool       OK                Healthy      False        False      127.9 GB      21.81 GB
Gather UpdateApp and verify it works
Start diskpart so you can mount MainOS:
list volume
# select the volume called MainOS
select volume 42
# assuming M: is free
assign letter=m

exit
From the MainOS partition, go and hunt down the following files and drop them in a standalone folder (for example, X:\WCOS\Tools):
\Windows\Servicing
- UpdateApp.exe
- CbsApi.dll
- CbsMsg.dll
\Windows\System32
- CbsCore.dll
- DrvServicing.dll
- IUSpaces.dll
- IUSpaces_vb.dll (copy and rename IUSpaces.dll)
- UpdateAPI.dll
- cimfs.dll
- cmiadapter.dll
- cmiaisupport.dll
- cmintegrator.dll
- dpx.dll
- drvstore.dll
- msdelta.dll
- mspatcha.dll
- mspatchc.dll
- turbostack.dll
- wcp.dll
- wdscore.dll
Run cmd.exe as administrator, go to the tool directory, and try getting the installed packages on the image:
cd /d X:\WCOS\Tools
updateapp getinstalledpackages
The result should look a lot like the following:
UpdateApp - Update Application for Windows Mobile

[00:00:00] Loaded servicing stack from X:\wcos\tools with session name IUPackageInfoSession_EFIESP
[00:00:00] External storage staging directory is: (null)
[00:00:00] Closing session IUPackageInfoSession_EFIESP
[00:00:00] Loaded servicing stack from X:\wcos\tools with session name IUPackageInfoSession_MainOS
[00:00:00] External storage staging directory is: (null)
[00:00:01] Closing session IUPackageInfoSession_MainOS
164 packages:
        Microsoft-OneCore-HyperV-Guest-UpdateOS-Package~31bf3856ad364e35~amd64~en-US~10.0.19563.1000, UpdateOS
        Microsoft-OneCore-HyperV-Guest-UpdateOS-Package~31bf3856ad364e35~amd64~~10.0.19563.1000, UpdateOS
        Microsoft-OneCore-ServicingStack-UpdateOS-Package~31bf3856ad364e35~amd64~~10.0.19563.1000, updateos
        Microsoft-OneCore-ServicingStack-UpdateOS-UX-Package~31bf3856ad364e35~amd64~~10.0.19563.1000, updateos
        Microsoft-OneCoreUpdateOS-Product-Package~31bf3856ad364e35~amd64~en-US~10.0.19563.1000, updateos
        Microsoft-OneCoreUpdateOS-Product-Package~31bf3856ad364e35~amd64~~10.0.19563.1000, updateos
        Microsoft-Windows-OneCoreUpdateOS-ImageCustomization-Package~31bf3856ad364e35~amd64~~10.0.19563.1000, updateos
        Microsoft-Composable-ModernPC-BootEnvironment-Core-CodeIntegrity-Sbcp-Package~31bf3856ad364e35~amd64~~10.0.19563.1000, EFIESP
        Microsoft-OneCore-BcdBootoption-Package~31bf3856ad364e35~amd64~~10.0.19563.1000, EFIESP

        [...]

getinstalledpackages completed successfully
command took 7 seconds
If it does, congratulations! You can move on to the next step.
Inject graphics and network drivers
In 20279, these steps may arbitrarily fail. You can execute them from Windows PE as well after copying the image, if you copy the drivers to your USB flash drive, and can tell which drive letter is your UFD.
For this example we'll show the Intel HD Graphics driver, but you might need to add more INFs depending on your hardware. If you can't find the right INFs, why are you even doing this?
Place extracted Intel drivers in a directory, so that you have e.g. X:\WCOS\DHCUDrivers\Graphics\iigd_dch.inf. Open iigd_dch.inf, and note down the values for 'Provider' and 'DriverVer'. For me, those were:
Provider=%Intel%
DriverVer=08/23/2019,26.20.100.7158
The provider name is an indirected variable here, so we go and find what %Intel% meant as well. A bit below in the INF, we find the following:
Intel = "Intel Corporation"
Good! Now, invoke updateapp with the data we've just discovered to install the INF to the BSP partition in your WCOS image:
updateapp install "DriverPackage|X:\WCOS\DHCUDrivers\Graphics\iigd_dch.inf|Intel_Corporation-iigd_dch.inf~amd64~26.20.100.7158~bsp|0"
Note the recurrence of Intel_Corporation and 26.20.100.7518. The installation process will complain with an error code of c0880005 if you get the 'keyform' wrong.
The general rule for inf file names and provider names in the 'keyform' is the following:
- Any space in the inf name or the provider name must get replaced by an underscore '_'
- Any dash in the inf name or the provider name must get replaced by an underscore '_'
Finally, commit and finalize the image so future update application won't fail:
updateapp finalizecommit
After you've installed your favorite driver packages, we can prepare the utility flash drive.
Make a utility flash drive
Gather the following assets into a directory we'll label X:\WCOS\UtilityDrive\Boot:
-
From an ISO of Windows 10 21286 or above (you can get it from the Windows Insider Preview 'advanced' page):
- boot\
- EFI\
- sources\boot.wim
- bootmgr.efi
-
For later servicing, your WCOS\Tools folder. Use a hex editor to replace any mention of the Unicode string
X:\Windowsin UpdateAPI.dll and UpdateApp.exe with something likeX:\Wbndows, or expect any servicing tasks to fail. -
An x64 EFI shell. Rename EFI\boot\bootx64.efi to EFI\boot\winx64.efi, and name the shell as EFI\boot\bootx64.efi. You'll need the shell in order to ever boot regular Windows again (including PE).
-
A file called
startup.nshin the root:dmpstore -d SecureBootPlatformID -guid 77FA9ABD-0359-4D32-BD60-28F4E78F784B fs0:\efi\boot\winx64.efi fs1:\efi\boot\winx64.efi fs2:\efi\boot\winx64.efi fs3:\efi\boot\winx64.efi fs4:\efi\boot\winx64.efi fs5:\efi\boot\winx64.efi fs6:\efi\boot\winx64.efi fs7:\efi\boot\winx64.efi fs8:\efi\boot\winx64.efi fs9:\efi\boot\winx64.efi fsA:\efi\boot\winx64.efiIf you are having troubles getting back to Windows PE/Windows Desktop, you may also try the following extra commands in startup.nsh: (Warning: these will kill every variables you have saved on your system)
dmpstore -d -guid BA57E015-65B3-4C3C-B274-659192F699E3 dmpstore -d -guid 77FA9ABD-0359-4D32-BD60-28F4E78F784B dmpstore -d -guid EAEC226F-C9A3-477A-A826-DDC716CDC0E3 -
gdisk64.exe from GPT fdisk.
Partitioning
- Connect your UFD.
- Open
diskpart. -
list disk,select diskthe right disk, or you'll lose all data on it and will have to do a long partition scan to have any hopes of retrieving your data, andclean+convert gpt. -
create partition primary size=5000,format fs=fat32 quick,assign letter=yto make a bootable FAT32 partition. -
create partition primary,format fs=exfat quick,assign letter=zto make an exFAT partition to house the VHDX.
Putting things in place
Place your boot drive directory on the drive you called Y:. Dismount-VHD "X:\WCOS\Flash.vhdx in your PowerShell to unmount the VHDX, and copy the VHDX to Z:. You should now have a tree structure similar to:
Y:\
    Boot\
    EFI\
    Sources\
    Tools\
    startup.nsh

Z:\
    Flash.vhdx
Eject and unplug the UFD.
Target work
Use your throwaway laptop or other modern enough system with larger-than-128GB system drive. Make sure Secure Boot is off.
Boot Windows PE
Boot it on the target. Really. Once you get into Setup, press Shift-F10 to open a command prompt. Go back and open another, for good measure. Alt-Tab works for switching here.
Copy the VHD (destructive!)
Find out where your USB flash drive is mounted. This will involve doing a lot of the following:
C:
dir
D:
dir
E:
dir
F:
dir
Here, we'll assume the boot volume is D: and the volume with Flash.vhdx is E:.
Open diskpart, and attach the VHD:
select vdisk file=E:\flash.vhdx
attach vdisk readonly
# wait a minute or so
list disk
# if MainOS etc. show up as online, good!
Note down the ID of a 2048 MB disk with a 2048 MB free space, and subtract 1 from it.
  # note: there's no 16
  Disk 17   Online         2048 MB  2048 MB
The ID to note down, therefore, is 16. Also, note down the ID of the target disk (3 in this case).
Wipe it. Yes. That's data loss for you. Make sure you've got backups of anything important on there.
select disk 3
clean
convert mbr
exit
(replacing 3)
Copy the VHDX's content to your disk:
E:\Tools\ddrelease64 if=\\.\physicaldrive16 of=\\.\physicaldrive3 bs=8M --progress
(replacing 16 and 3)
... and go have a hot beverage while waiting for this to hit 131072M.
Rebuild the GPT (for 512-byte disks only)
You probably have a 512-byte disk, so you're going to have to rebuild the GPT. Yay!
Run commands along the following:
> E:\tools\gdisk64 -l \\.\physicaldrive16
[..]
Number  Start (sector)    End (sector)  Size       Code  Name
   1             512            8703   32.0 MiB    EF00  BS_EFIESP
   2            8704        33554426   128.0 GiB   4202  OSPool
Remember the numbers (start, end, code and name) for each partition. Multiply the numbers by 8 (since 4K/512 = 8) - so you get 4096, 69624, etc.
Now, we'll create a new GPT for the target disk:
E:\tools\gdisk64 \\.\physicaldrive3
# accept any warning
x
z

E:\tools\gdisk64 \\.\physicaldrive3
# accept the warning
n
1
4096
69631
EF00

n
2
69632
268435415
4202

c
1
BS_EFIESP

c
2
OSPool

p
# check if it makes sense - matches the above but with different sector numbers
w
Exit all open windows, and your system should reboot.
Boot Windows PE, again
Boot into Windows PE again - not the internal disk you just overwrote. Verify in diskpart if you can list volume and it'll show MainOS etc. without you having attached the VHD.
Remove WCOS Security
In Windows PE, open diskpart and do select volume. Find the volume named ÈFIESP we will assume here its volume id is 6, yours may be different. Then we run select volume 6 and assign. Do list volume again to find the drive letter of EFIESP, in our case it's E:, yours may be different.
Delete the following file:
del E:\efi\Microsoft\Boot\SecureBootPolicy.p7b
You may additionally replace winsipolicy.p7b with the one from a desktop sku (the file is located in the same folder).
Boot W10X
OK, now you can boot your internal disk. If you haven't followed the Remove WCOS Security instructions, this will set a Secure Boot policy value, however, so you'll have to boot your utility flash drive again if you want to boot any other Windows media (or otherwise execute the dmpstore command).
If everything's right, you should be booting into Windows 10X, and your graphics adapter might even be working.